 You know you have seen them before, a series of baseline dimensions with differing spaces or adjusted manually until they look fine. You can use the DIMSPACE command to adjust the space to a set distance between them or use the default automatic. So I put together a quick example of using DIMSPACE.
From the Menu Dimension> Dimension Space

From the Dimension toolbar![]()
![]()
From the AutoCAD Command Line: DIMSPACE
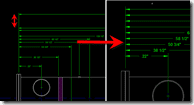
Before using DIMSPACE
Baseline dimensions selected

Completed with a consistent spacing between dimensions

For the smart buggers that need multiple ways or are currently shouting out the alternatives at their browser, yes you could also use QDIM to change the style or space as well and perhaps 3 or more others ways to accomplish it but I was trying to focus on DIMSPACE. 😉
Cheers
Shaan
This is a very useful function, Thanks for your explanation.
Have you tried this with vertical dimensions? I cannot make it work right with vertical dimensions. No matter what order I select the dimensions to be space it doesn’t put them in the right order.
PING:
TITLE: OYA AutoCAD 2008 Tip Adjust the Dimension Spacing
BLOG NAME: Between the Lines
One Year Ago (OYA)
Recycling tips that are still valuable and may not be found except by a search engine. This tip is also good for AutoCAD 2009.
AutoCAD 2008 Tip Adjust the Dimension Spacing